My blog presents new innovations in computer software/hardware technology, linux related useful tips, review of some softwares, IT related achievements in Nepal.
Saturday, December 22, 2007
Extracting email addresses from multiple files
Now sending notification to everyone about their selection status was a problem. One option was to open the .txt file one by one then copy and paste the email address which was way too manual and time consuming (not less than 2 hours). Hence, we thought of an alternative.
I placed all the .txt files in a folder 'application'. Then I extracted out the lines that contained email addresses. The following simple yet powerful command did this for me.
jitendra@jitendra:~/application$ cat *.* | grep '@' > email_lines
cat *.* concatenated all the files in the directory and grep extracted the lines containing @. The output was directed to a file email_lines. The output contained lines like the one shown below:
(g) Email address: abc@gef.com
Though this command was sufficient to simplify out task and I could have done with it with more 15 minutes processing. But I wanted to go further experimenting and making the task more simple.
Now what I wanted was the section only after : from each line. This was accomplished using cut command. I went about like this.
jitendra@jitendra:~/application$ cut -d: -f2 email_lines>email_list
cut command remove the sections from each line of files. Here -d defined : to be the delimiter. -f was used to select the field. 2 specifies the field to the right of the delimiter : . 1 would have specified field to the left of delimiter. email_lines is the file from which the field section has to be removed. I directed the output to email_list.
Now I had a list of email addresses only. I preferred adding comma manually to them to create a comma separated list of email-addresses to send the notification.
The task which would have otherwise taken more than 2 hours was over in less than 10 minutes.
Sunday, November 18, 2007
GMail: Bigger and better
 The change comes in less than a month after GMail raised its mail size from around 2800 MB to 4300 MB.
With this, GMail makes it clear that size is never going to be a barrier in using GMail. Before you reach anywhere near the limit, you will get your mailbox size enlarged.
The improvements in UI are really a welcome change. Though the changes seem small, but I feel most of them are really awesome. Though I have not much explored the changes because of lack of time, the ones I liked are:
- The new color selection looks better than the previous one. Though the change in color appear only at few places.
- The change in position of Loading status display was long awaited. The previous design used to hide the Sign Out link in case of Loading.
- The contact info on mouse-hover is really a great feature.
Saturday, October 27, 2007
Brand your Site with Favicon
A favicon (short for 'favorites icon'), is an icon associated with a particular website and is displayed in URL bar, in the list of bookmarks and next to page title in tab-enabled browsers in a favicon enabled browser. Basically, favicon is a 16x16 pixel icon. 16x16 pixel is too small size but it can contain something really meaningful and attractive.
While Internet Explorer supports only .ico format, Firefox, Opera, Flock, etc support .png and .gif as well. So, if you are using static favicon, it is advisible to go with .ico file to have support for all browsers.
Firefox has even added support for animated .gif files. It won't be a big surprise if other browsers also add support for them in their new releases.
To have one on your webpage, go through the following steps:
- Create a 16x16 or 32x32 pixel ico/gif/png file and name it "favicon.xxx" where xxx is suitable extension.
- Include the following tag in the head element of the webpage if you are using .ico image.
- <link rel="shortcut icon" href="favicon.ico">
- If you are using .png or .gif image, use the following tag instead
- <link rel="shortcut icon" href="favicon.xxx" type="image/xxx"> where xxx is proper file type (gif/png).
Friday, October 19, 2007
Auto-forwarding mails from GMail to other mail accounts
Sign in to your Gmail account.
Click Settings on the top-right of your Gmail page.
Choose Forwarding and POP tab.
In the "Forward a copy of incoming mail to" textbox, write the email address where you want your emails to be forwarded. Choose one of the following as per your convenience from the drop down menu:
- Keep Gmail's copy in the inbox
- archieve Gmail's copy
- delete Gmail's copy
The screen shot below illustrates the task.
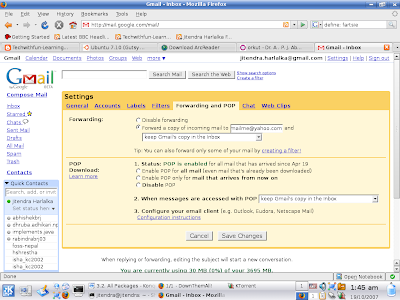
I am sure that was fun. Want some more? Ok, now I tell you to selectively forward the mails from Gmail inbox to other mailbox.
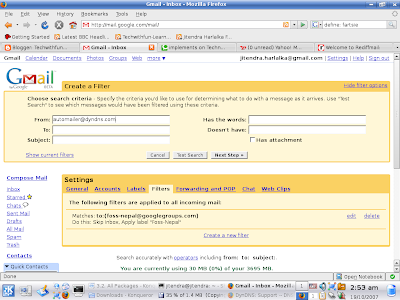
Choose Settings->Filters.
Click "Create a new filter".
Enter the criteria of filtering your mails.
Choose "Next step".
Provide email address where you desire to receive mails meeting the criteria you entered to "Forward it to:" option and check the option.
After this click on Create Filter button.
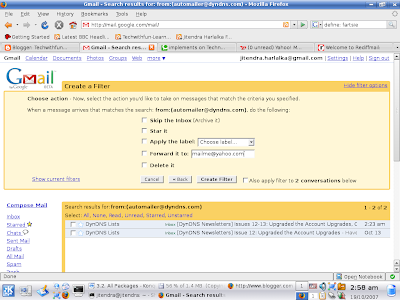
And you are done.
Was not that interesting? But I am sure you would not want to have your gmails in other accounts. Wish the other way round was true i.e., mails from other account could be auto-forwarded to Gmail.
Thursday, October 11, 2007
3D Modelling and Animation
If flash movies and animations are something that fancy you, you will surely love this: Animation and movies in 3D!!! According to a survey, global animation and gaming market was of 100 billion dollars in 2006 and the projection estimates this to grow to double by 2010. May be next time you think of making a model, an animation or a game, you use the softwares I tell you about. Believe me, it is much more effective.
Ever heard of 3Dmax or Maya, popular 3D animation softwares? While these are the good options, I prefer Blender-a free and open source 3D content creation suite. Primarily, because it is available for all the major OS: Linux, Windows, FreeBSD, Solaris, Mac OS X, IRIX. Another important feature of this suite is its extensibility using easy to use popular C and Python language unlike 3Dmax that requires Maxscript particularly created for this software for extensibility. For comparisons on different 3D development softwares, refer to:
http://wiki.cgsociety.org/index.php/Comparison_of_3d_tools.
Blender has got loads of features that allow modeling, skinning, UV unwrapping, texturing, rendering, non-linear editing, animating, etc. Moreover, it has got advanced simulation tools for rigid body dynamics, fluid dynamics, soft-body dynamics.
It has variety of features for primitive geometry like subdivision surface modeling, NURBS surfaces, Bezier Curves, can be integrated with YafRay, a free and open source ray tracer. The modifiers allow non-destructive effects. The key-framed animation includes inverse kinematics, non-linear animation, particle system with collision detection, etc.
The most amazing feature of Blender is Game Blender, a sub-project, that allows interactivity features. With collision detection, dynamics engine and programmable logic features, one can create stand-alone, real time applications of all sorts including high-end games.
Another great feature of Blender is an internal file system that allows to integrate different scenes in a single file with extension .blend. All images, textures are within a single file. Moreover, .blend file made in one version has good compatibility with the other version and blender on other platforms.
This software has improved a lot in the aspect of User Interface. While earlier versions required one to do almost everything through keyboard shortcuts, new versions are robust with menus.
I have only recently started learning Blender and found it very useful and easy to learn (but you need to go through proper tutorial for sure). Blender foundation is really working hard on improving the documentation. Tempted to give it a try but wondering where to start from? You will find the tutorial at here useful.
Communities have strongly been contributing in this aspect. There are many communities who can help you learn blender and solve your queries regarding it. Moreover, you can have a downloadable magazine with issues in 3D development at : http://blenderart.org.
So, don't stop yourself. Get going and add a new dimension to your knowledge.
Saturday, October 6, 2007
Configuring Kopete for Google Talk
Start Kopete.
Choose Settings->Configure...
Select Accounts from the left navigation bar.
Select New...
The screen should appear like this one.
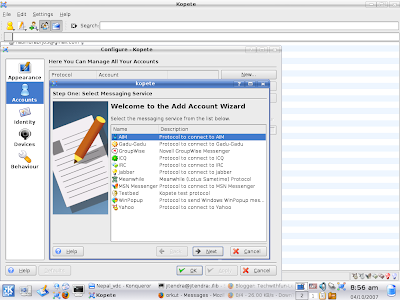 Choose Jabber and click Next.
The next screen should be like the one shown below:
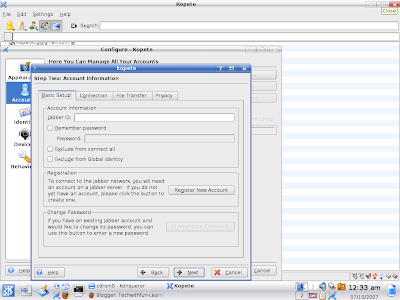
In the Jabber ID, enter your complete google account ID. For eg, I would enter jitendra.harlalka@gmail.com for me. Choose Remeber Password as per your convenience. In case you choose it, provide Password in the TextField. Similarly, you can choose Exclude from connect all and Exclude from Global Identity as per your convenience.
Now, choose Connection tab. It should look like this one.
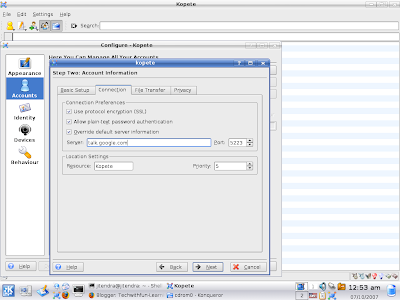
Check Use protocol encryption (SSL) and Override default server information. Type talk.google.com in the Server TextField. Keep Port to 5223. Click Next.
Choose color for your google talk ID. Click Finish button. You should find yourself online if you are connected to internet connection.
Tuesday, September 25, 2007
Finding fastest mirror/site
Perhaps, speed and efficiency will be the factor for you. But, how to know which one will be the fastest and efficient mirror?
The answer to this question is netselect. This package chooses the fastest server automatically. On providing space separated list of sites, it chooses the fastest server. The calculation involves various factors like ping time, number of hops required to reach the target, the percentage of ping requests that got through successfully.
For example, say you want to download apache from its official site. You will be provided with a list of mirrors (you will be provided with a suggestion for best mirror-site but lets ignore that for the moment). I chose to find the fastest one out of 3 mirrors: http://apache.mirrors.hoobly.com/ http://apache.hoxt.com/ http://veritris.com/mirrors/apache/ .
So, I typed
$ sudo netselect http://apache.mirrors.hoobly.com/ http://apache.hoxt.com/ http://veritris.com/mirrors/apache/
which gave me output
2175 http://apache.mirrors.hoobly.com/
Hence the fastest one out of 3 was found.
Actually, netselect gives score to each mentioned server on the basis of various factors. The lower the score is, better is the server response. Now, to know the score of each server, run netselect in very verbose mode with -vv option. For more information on netselect, refer to netselect manual.
Also try netselect to check fastest search engine at your location by supplying a list of search engines with the netselect command.
Netselect will definitely make your life easier especially if you are using slow dial-up connections.
N.B.: I tried this command on Debian based Distro, Ubuntu. This command works on Debian based systems but I am not sure about rpm based systems.
Monday, September 17, 2007
Listing the dependencies
apt-cache depends packages
where package is the name of the package of which dependencies are to be listed. For example,
Shown above is the output of the command for package "adduser". The output lists out the packages on which the specified package depends along with the sub-dependencies.
$ apt-cache depends adduser
adduser
  Depends: perl-base
  Depends: passwd
 |Depends: debconf
  Depends:
    cdebconf
    debconf
  Suggests: liblocale-gettext-perl
  Suggests: perl-modules
  Replaces: manpages-pl
  Replaces: manpages-it
Now, you are ready to use the above command to list the files on which your desired package depend, copy .deb files and install them using dpkg or other package managers. Rock your Linux box and enjoy!!!
Wednesday, September 12, 2007
File type description
~~~~~~~~~~~~~~~~~~~~~~~~~~~~~~~~~~
-rw-r--r-- 1 jitendra jitendra 0 2007-07-28 19:19 mysqlaccess.log
drwxr-xr-x 11 jitendra jitendra 4096 2007-05-17 03:51 netbeans-5.5
-rw-r--r-- 1 root root 806 2007-05-04 13:49 python-defaults_2.5.1-0ubuntu3.dsc
-rw-r--r-- 1 jitendra jitendra 102447 2007-05-10 17:03 showthread.html
-rw-r--r-- 1 jitendra jitendra 29976 2007-09-06 18:02 ubuntu-files
-rw-r--r-- 1 jitendra jitendra 123 2007-08-26 21:11 version.h
~~~~~~~~~~~~~~~~~~~~~~~~~~~~~~~~~~~~~~~~
Do you know what does the first characeter in the line denote? Basically, it denotes the file type. In the above output, you find '-' and 'd' as first characters but these are not the only ones. Let me tell you about the possible options and their meanings.
d         The entry is a directory.
As is clear, the entry denotes a directory.

D         The entry is a door (Solaris).
The concept of door is derived from Solaris.

l         The entry is a symbolic link.
Symbolic links are like shortcuts (M$-Windows naming convention).
l denotes symbolic links. Use ln command to create symbolic links.

b         The entry is a block special file.
As you may be aware that Linux treats every device as a file.
b denotes file corresponding to block devices like disk partition,
RAM, etc.

c         The entry is a character special file.
This is for another type of device called character devices. These
are not hardware device. The entries falling under this category are
console, tty, etc.

p         The entry is a FIFO (or "named pipe") special file.
Unlike normal files, "named pipe" do not contain any user information and
facilitate communication between two processes by reading/writing from/to
this file.

s         The entry is an AF_UNIX address family socket.
As is clear, this file is for socket connection.The connection is internal
and can't be invoked from outside.

-         The entry is an ordinary file.
The files we create are generally of this type.
The text files, graphics and all other are candidate of this type of file.
If you have never come across these symbols, use 'ls -l' in /dev directory. You will find most of them. However, if you are an end-user, you will never need to create files of type except '-', 'd' and 'l'.
What type of file types did you locate?
Saturday, September 8, 2007
Linux knows your fortune
Go to console and type
$ fortune fortunes.
For me it was
You are taking yourself far too seriously.
Ha ha!! What fortune Linux predicted for you?
Type the same command again and again to see more predictions.
Basically, fortune maintains text files from which it selects a random epigram. In the above command fortune is the name of command and fortunes is the category. You can choose from a lot many categories. To see the categories available to you, type
$ fortune -f
And say you want something on love, type
$ fortune love
The output that appeared on my monitor was
People think love is an emotion. Love is good sense.
-- Ken Kesey
You can simply type fortune to see output from a random category.
The best output I found was
C:\> WIN
Bad command or filename
C:\> LOSE
Loading Microsoft Windows ...
But if you are the one who easily gets offended, please please don't install the package fortunes-off. Don't install it rather than being offended. And go through the manual for more options.
$ man fortune
May Linux have good fortunes in store for you.
Was that wonderful? Please, share.
Friday, September 7, 2007
Displaying uncommented and non-blank lines
Let me explain this with an example of a file that contains a few typical lines from xorg.conf. I call this file neat_file and in my case it looks like this.
~~~~~~~~~~~~~~~~~~~~~~~~~~~~~~~~~~
Section "ServerLayout"
     Identifier "Default Layout"
     Screen "Default Screen"
     InputDevice "Generic Keyboard"
     InputDevice "Configured Mouse"
     #InputDevice "stylus" "SendCoreEvents"
     #InputDevice "cursor" "SendCoreEvents"
     #InputDevice "eraser" "SendCoreEvents"
EndSection

Section "DRI"
     Mode 0666
EndSection
~~~~~~~~~~~~~~~~~~~~~~~~~~~~~
Let me dissect this problem in portions to ensure that you understand this properly.
$ grep -v '^$' neat_file
^ denotes the beginning of the line and $ denotes the end of the line. So, '^$' denotes blank lines. -v option inverts the selection. Hence, what we get is the non-blank lines. With this half the task is done.
$ grep -v '^#' neat_file
This command is similar to one above except the fact that it looks for lines starting with #. Alas! it doesn't work. It is because in our case the commented lines begin with blank space not #. So, what is the solution?
$ grep -v ^' *#' neat_file
* represents zero or more occurrences. Since, * is preceded by blank space and followed by a #, it will look for zero or more occurrences of blank space followed by a #. And, as usual -v will invert the selection and give those lines which do not match this pattern that is uncommented lines.
Now, how to combine these commands to get desired result?
$ grep -v '^$' neat_file |grep -v ^' *#'
| combines different commands.
Was that useful? Do, comment.
Monday, September 3, 2007
Review of B3 web-browser
I came across this web-browser while I was searching for something else. A web-browser by AOL, it sounded great to me. So, I thought to find out what it was. I came to know it can run in inside your web-browser on different platforms and according to them it can run on Internet Explorer, Firefox, Safari, Opera and many other browsers. I couldn't understand what could be the use of a browser that needs the support of other browser. Anyways i thought why not give it a try? Guess what, no need to download packages. Just click this link users.aol.com/stevejrice/b3browser/browser.html
and your browser may look like this if you are using firefox.

When I chose OK, the alert message was displayed which said "Most excellent choice!". But you will run into trouble with the alert boxes popping out regularly which say "Gotcha! April Fools! hee hee..." in case you choose Cancel.
Anyways, I typed in the navigation bar provided by AOL www.google.com and as expected google search page was there. I tried it out for yahoo and many others. It worked. But to much dismay, the excitement ended here. When you click on a hyperlink, the navigation bar's URL doesn't change on AOL. While on your original browser (firefox or any other), the URL displayed is the URL of B3 and not the page you are currently visiting. So, it is very difficult to figure out the page URL you have currently opened. It was really getting difficult for me to bear with this so called browser and understand why AOL designed it.
The biggest shock came to me when I tried to test the browser's support for plugins. I opened same page in B3 (firefox) as well as B3 (konqueror) which required JRE (Java Runtime Environment) enabled. JRE is enabled in my Firefox but not in konqueror. The page in firefox opened while not in Konqueror. That was a shock!!!
I thought if I had carried on with it that much, why not try it in elinks too. The browser opens but URLs typed can't be opened.
The AOL claims its browser is for consistency and gaming. Though the product is still in alpha phase according to the link I found, I simply disagree with the idea of a browser inside another browser which is doing absolutely fine.
What I can understand is that B3 is merely a ad on top of your page in the browser displayed for free (atleast adsense pays you for the ads on the page) that forwards the URL typed in its input box to your original browser. Otherwise, why different results in case of Jave enabled page. I may be wrong but it was my experience.
Try out and post your experience in the comments.
Saturday, September 1, 2007
BVS, First Private School to opt for Linux!!!
LTSP (Linux Terminal Server Projects) has already been running in 4 schools in Nepal (in Dang, Bhaktapur, Phulchowki, Myagdi). Several projects are still under planning. These projects were funded by HeNN (Help-Nepal) and MPP (Madan Puraskar Pustakalaya). Luckily, I was a part of the project in Bhaktapur funded by Help-Nepal.
But today (September 1, 2007) is a special moment in the FOSS (Free and Open Source Software) history of Nepal because today Brihaspati Vidya Sadan (BVS), Naxal, a reputed school in the capital got Linux installed in the PCs in its computer Lab. I was lucky this time too. I was part of this historic moment as well.
The computers didn't have cdrom so the installation method preferred was Net-Boot. Shishir dai configured his laptop for DHCP (Dynamic Host Communication Protocol) and TFTP (Trivial File Transfer Protocol). And made the Ubuntu available on his apache server. While, Ujjwal helped debug the errors that occured, we (me and my classmates along with a junior Kulchandra) looked at the installation in the PCs. The computers, hence, were ready to install Ubuntu from Network. And now Linux co-exist on the PCs with MS-Windows. Though, some additional packages still need to be installed which will soon be done, the greatest achievement is at least students have something to start with and know that much exist beyond Windows.
For the qbasic programming (that is a part of the curriculum for computers), we will we installing dosbox and wine. Besides, we will have bluefish editor, gcompris suite and other stuffs.
Hats off to Pravin Dai, BVS, Shishir dai who have reached a milestone with this step and have set example for other schools. I wish this step helps government consider for a syllabus based on Free and open source rather than propritory.
Cheers
Wednesday, August 29, 2007
Changing MAC Address
ifconfig ethx down
where ethx is the interface. This command is to deactivate the ethernet card.
ifconfig ethx hw ether xx:xx:xx:xx:xx:xx
where xx:xx:xx:xx:xx:xx is the 12 digit hex address which you want the address of your ethernet card to be.
ifconfig ethx up
This command is to activate the ethernet card.
And you are there.
There are softwares like macchanger which can also be used to change the MAC address. They do not do anything different from the previous method expect allowing you change to MAC address from particular vendor. So, the above method is advisible rather than using macchanger.
But your MAC address gets restored once you restart your computer. Now how to this permanently. Well, there are different methods for this. You can write a script and add to your run-level to load it when computer boots. But I prefer a more easy and convenient method of editing the file /etc/network/interfaces.
In the above file, you will see line like
auto ethx
Below this line add the following line:
hwaddress ether xx:xx:xx:xx:xx:xx
N.B. : You will need root permissions to do the above tasks.
The above examples are given with reference to Kubuntu-7.04. The methods described above should work with others Linux distros as well.
Saturday, August 25, 2007
Acid Test for Web browsers
Have u ever wondered if your web-browser follows the agreed standards. You can have acid test for your web-browser at the following link:
http://www.webstandards.org/action/acid2/#content-main
This page links to a test script for checking whether your web browser confronts to the setup standard. I tested it on Mozilla Firefox and Konqueror.
I was pretty sure that Firefox will pass the acid test but it badly disappointed me. It didn't properly support the transparency and other features. Well, the page specifically mentioned that Browser had to be in default setting. I guess mine is.
With very little expectations, I tested it on Konqueror. Guess what, it rendered it perfectly (at least what it seemed at first sight!). It was something unbelievable. Now I guess I have answers why Apple chose to base its Safari on Konqueror. But with some more efforts I could find some problem with Konqueror also. Certain portion of image moved when scrolled while other portion was static. That is it had problem with fixed-positioning. Moreover, re-sizing of the window distorted the image.
I read the Opera performance on the link provided above. What I figured out was that Opera also have same faults as Konqueror.
I wish I could test the other web-browsers but I had only these two installed.
Does your browser pass the acid-test? Do comment.