Saturday, October 27, 2007

Brand your Site with Favicon

Want to give your website a professional look? Want it to be distinctly identified among others? Static and animated favicons, can work for you.

A favicon (short for 'favorites icon'), is an icon associated with a particular website and is displayed in URL bar, in the list of bookmarks and next to page title in tab-enabled browsers in a favicon enabled browser. Basically, favicon is a 16x16 pixel icon. 16x16 pixel is too small size but it can contain something really meaningful and attractive.

While Internet Explorer supports only .ico format, Firefox, Opera, Flock, etc support .png and .gif as well. So, if you are using static favicon, it is advisible to go with .ico file to have support for all browsers.
Firefox has even added support for animated .gif files. It won't be a big surprise if other browsers also add support for them in their new releases.

To have one on your webpage, go through the following steps:
  1. Create a 16x16 or 32x32 pixel ico/gif/png file and name it "favicon.xxx" where xxx is suitable extension.
  2. Include the following tag in the head element of the webpage if you are using .ico image.
    • <link rel="shortcut icon" href="favicon.ico">
  3. If you are using .png or .gif image, use the following tag instead
    • <link rel="shortcut icon" href="favicon.xxx" type="image/xxx"> where xxx is proper file type (gif/png).
With this you are ready with one on your page.

N.B.: GIMP can be used to create .ico image. And if you are looking for creating an animated gif image using GIMP, you can find a good tutorial to start with at http://www.novell.com/coolsolutions/feature/1664.html

Friday, October 19, 2007

Auto-forwarding mails from GMail to other mail accounts

Do you want to have fun with your mailbox? Want to receive mails sent to your Gmail Account in your Yahoo, Hotmail or any other mailbox? That means even another Gmail account. Believe me, this is quite possible. Let me tell you how.

Sign in to your Gmail account.
Click Settings on the top-right of your Gmail page.
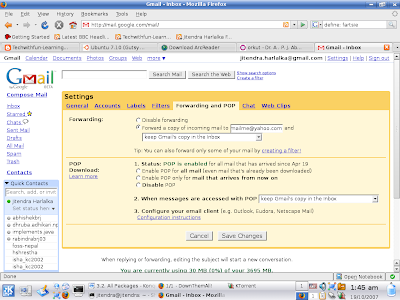
Choose Forwarding and POP tab.

In the "Forward a copy of incoming mail to" textbox, write the email address where you want your emails to be forwarded. Choose one of the following as per your convenience from the drop down menu:
  • Keep Gmail's copy in the inbox
  • archieve Gmail's copy
  • delete Gmail's copy
Choose Save Changes.
The screen shot below illustrates the task.


So, from now on you will receive the mails sent to you on your Gmail account in the account convenient to you.

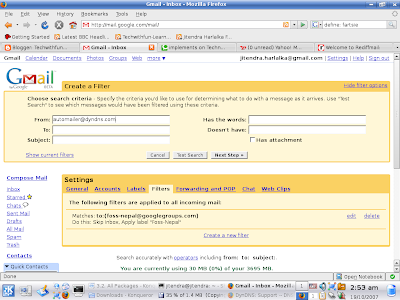
I am sure that was fun. Want some more? Ok, now I tell you to selectively forward the mails from Gmail inbox to other mailbox.

Choose Settings->Filters.

Click "Create a new filter".

Enter the criteria of filtering your mails.
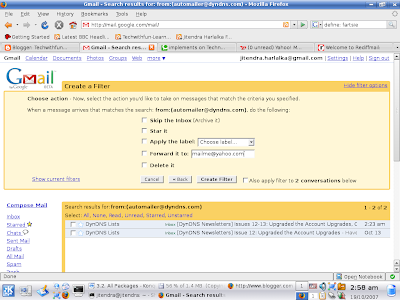
Choose "Next step".


Provide email address where you desire to receive mails meeting the criteria you entered to "Forward it to:" option and check the option.

After this click on Create Filter button.


And you are done.

Was not that interesting? But I am sure you would not want to have your gmails in other accounts. Wish the other way round was true i.e., mails from other account could be auto-forwarded to Gmail.

Thursday, October 11, 2007

3D Modelling and Animation

If flash movies and animations are something that fancy you, you will surely love this: Animation and movies in 3D!!! According to a survey, global animation and gaming market was of 100 billion dollars in 2006 and the projection estimates this to grow to double by 2010. May be next time you think of making a model, an animation or a game, you use the softwares I tell you about. Believe me, it is much more effective.

Ever heard of 3Dmax or Maya, popular 3D animation softwares? While these are the good options, I prefer Blender-a free and open source 3D content creation suite. Primarily, because it is available for all the major OS: Linux, Windows, FreeBSD, Solaris, Mac OS X, IRIX. Another important feature of this suite is its extensibility using easy to use popular C and Python language unlike 3Dmax that requires Maxscript particularly created for this software for extensibility. For comparisons on different 3D development softwares, refer to:
http://wiki.cgsociety.org/index.php/Comparison_of_3d_tools.

Blender has got loads of features that allow modeling, skinning, UV unwrapping, texturing, rendering, non-linear editing, animating, etc. Moreover, it has got advanced simulation tools for rigid body dynamics, fluid dynamics, soft-body dynamics.
It has variety of features for primitive geometry like subdivision surface modeling, NURBS surfaces, Bezier Curves, can be integrated with YafRay, a free and open source ray tracer. The modifiers allow non-destructive effects. The key-framed animation includes inverse kinematics, non-linear animation, particle system with collision detection, etc.

The most amazing feature of Blender is Game Blender, a sub-project, that allows interactivity features. With collision detection, dynamics engine and programmable logic features, one can create stand-alone, real time applications of all sorts including high-end games.
Another great feature of Blender is an internal file system that allows to integrate different scenes in a single file with extension .blend. All images, textures are within a single file. Moreover, .blend file made in one version has good compatibility with the other version and blender on other platforms.

This software has improved a lot in the aspect of User Interface. While earlier versions required one to do almost everything through keyboard shortcuts, new versions are robust with menus.
I have only recently started learning Blender and found it very useful and easy to learn (but you need to go through proper tutorial for sure). Blender foundation is really working hard on improving the documentation. Tempted to give it a try but wondering where to start from? You will find the tutorial at here useful.
Communities have strongly been contributing in this aspect. There are many communities who can help you learn blender and solve your queries regarding it. Moreover, you can have a downloadable magazine with issues in 3D development at : http://blenderart.org.


So, don't stop yourself. Get going and add a new dimension to your knowledge.

Saturday, October 6, 2007

Configuring Kopete for Google Talk

If you heard Pidgin has a support for Google Talk and are disappointed for not having it in your Kopete, don't worry you have a way out. You can configure your kopete to work for Google Talk just like you do for Yahoo, MSN, AIM or others. Here is a how to to make things happen for you:

Start Kopete.
Choose Settings->Configure...
Select Accounts from the left navigation bar.
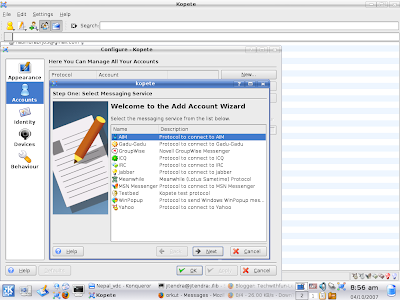
Select New...
The screen should appear like this one.
Choose Jabber and click Next.

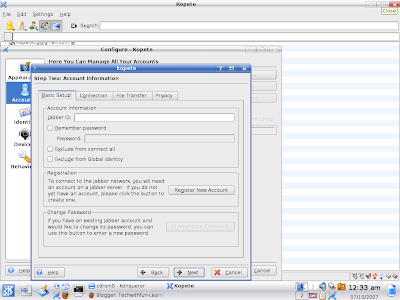
The next screen should be like the one shown below:

In the Jabber ID, enter your complete google account ID. For eg, I would enter jitendra.harlalka@gmail.com for me. Choose Remeber Password as per your convenience. In case you choose it, provide Password in the TextField. Similarly, you can choose Exclude from connect all and Exclude from Global Identity as per your convenience.

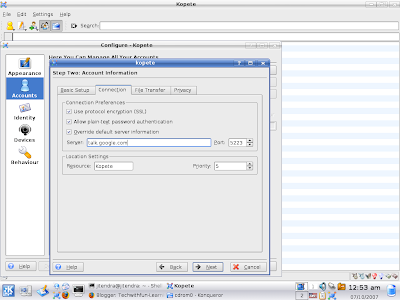
Now, choose Connection tab. It should look like this one.

Check Use protocol encryption (SSL) and Override default server information. Type talk.google.com in the Server TextField. Keep Port to 5223. Click Next.

Choose color for your google talk ID. Click Finish button. You should find yourself online if you are connected to internet connection.